The GUI (TexText 0.11)
TexText 0.11 extension entry
After installation TexText 0.11 will appear under :
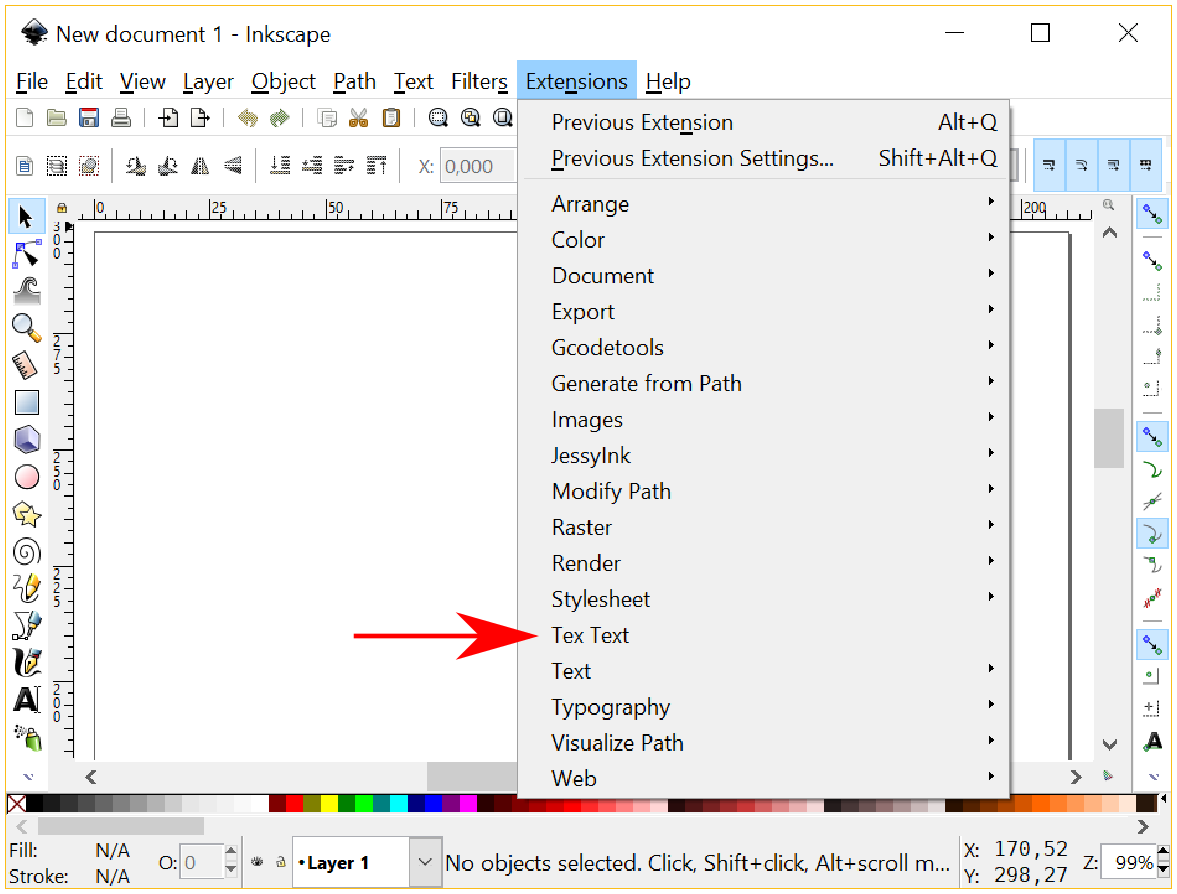
When you select it, a dialog will appear that lets you enter any LaTeX code you want (presumably your formula).
Dialog overview
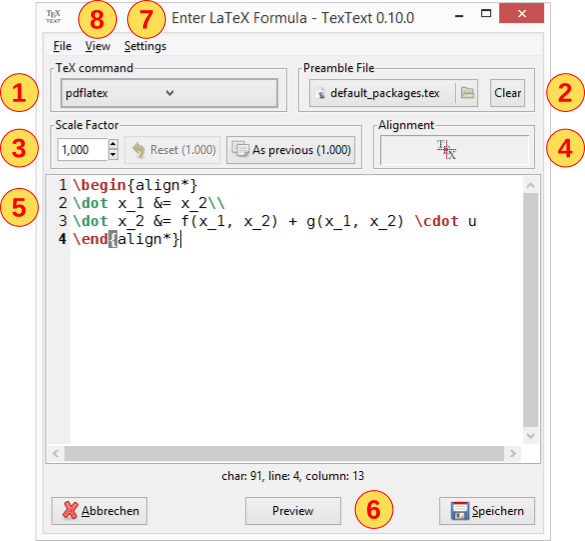
You enter your LaTeX code into the edit box  . In the case you
installed PyGTK it will show you line and column numbers. If you
additionally installed PyGTKSourceView it will also highlight the syntax
with colors. You can add any valid and also multi-line LaTeX code.
There are additional settings which can be adjusted to your needs:
. In the case you
installed PyGTK it will show you line and column numbers. If you
additionally installed PyGTKSourceView it will also highlight the syntax
with colors. You can add any valid and also multi-line LaTeX code.
There are additional settings which can be adjusted to your needs:
The TeX command to be used for compiling your code (group box
 ).
Possible options are:
).
Possible options are: pdflatex,xelatex,lualatex. See section Available TeX compilers for more details.Custom Preamble file (group box
 )
)The scale factor (group box
 ). See section Scaling of the output.
The alignment relative to the previous version of your code (group box
 , only available when re-editing your code). See section Alignment of the output.
The coloring of the output using TeX commands or Inkscape settings. See section Colorization of the output.
The default math environment in new nodes (menu
 ), see section Configuration of the default TeX math-environment.
The appearance of the editor (menu
 ), see section Configuration of the code editor.
Your LaTeX code and the accompanying settings will be stored within the new SVG node in the document. This allows you to edit the LaTeX node later by selecting it and running the Tex Text extension (which will then show the dialog containing the saved values).
There is a preview button  as well, which shortens the feedback cycle
from entry to result considerably, so use it! See section Preview button
as well, which shortens the feedback cycle
from entry to result considerably, so use it! See section Preview button
Available TeX compilers
New in version 0.8.0.
Your LaTeX code can be compiled using three different compilers:
pdflatex, xelatex, lualatex (as long as the corresponding
commands are found by your system). You can select the command in the
combobox . The last two ones are especially useful for using UTF-8
input or if you require Lua commands. Of course you can use UTF-8 input
with the pdflatex command as well as long as you provide
usepackage[utf8]{inputenc} in your preamble file (see Preamble file).
Some things to be kept in mind:
Place the required lua packages in your preamble file if you want to compile your code with
lualatex.If you use
lualatex/xelatexfor the very first time on your system it may take some time until the fonts are setup properly. During that time TexText 0.11 might be unresponsive.Windows:
xelatextends to be very slow on Windows machines, see this post on Stackexchange.
Preamble file
Be aware of including the required packages in the preamble file if you
use special commands in your code that rely on such packages. The
preamble file can be chosen by the selector . The default preamble
file shipped with TexText 0.11 includes the following packages:
\usepackage{amsmath,amsthm,amssymb,amsfonts}
\usepackage{color}
Basically, your LaTeX code will be inserted into this environment:
\documentclass{article}
% ***preamble file content***
\pagestyle{empty}
\begin{document}
% ***Your code***
\end{document}
This will be typeset, converted to SVG and inserted into your Inkscape document.
Scaling of the output
In most of the cases you will need to adjust the size of the produced SVG output to match the conditions of your drawing. This can be done by two methods:
After compilation adjust the size of the SVG output using the mouse in Inkscape. You should lock the width and height to keep the proportion. Be careful to not break the group!
Before compilation you specify a scale factor in the spinbox of the groupbox
.
Both methods are fully compatible. If you scale your SVG output in Inkscape the numerical value of the spinbox will be adjusted appropriately when you open TexText 0.11 on that node later. In both cases the scale factor is preserved when you re-edit your code.
A scale factor of 1 means that the output is sized as it would appear in
a regular LaTeX document, i.e., a font size of x pt in LaTex matches
that of x pt in Inkscape:

There are two additional buttons in the groupbox :
Reset: This button is only available when re-editing existing TexText 0.11 nodes. It resets the scale factor to the value the code has been compiled with the last time. This is useful when playing around with the scale factor and decide to not change the scale factor.
As previous: This button sets the scale factor of the currently edited node to the value of the node which has been edited previously. This is useful when you found a scale factor to be suitable and want to apply this scale factor also to any new or existing nodes you open for editing.
If you have re-sized the SVG output in Inkscape without keeping the proportions the re-compiled output will be placed with correct proportions according to the alignment.
Alignment of the output
New in version 0.8.0.
When you edit existing nodes it is likely that the size of the produced
output will change, for example if you modify the input $sin(x)$ to
$intsin(x)text{d}x$. The entries of the spinbox determine how
the new node is aligned relatively to the old node. The default
behaviour is middle center, i.e. the middle of the new node is placed
on the middle of the old node. Available options are:
|
|
|
|
|
|
|
|
|


Of course, the content of the groupbox is only available when
editing existing nodes.
Colorization of the output
There are two ways for colorization of the output:
The most natural way is to select the produced SVG output in Inkscape and set the fill and the contour color to the same value according to your needs. When you re-compile your node this color will be persevered as long as you do not use any color specifications in your LaTeX code. You can also colorize characters individually be selecting them with the mouse after having pressed F2. Be careful not to break the group.
Caution
Individual symbol colorization done in Inkscape will not be kept after re-compilation.
Alternatively, you can use LaTeX commands like
textcolorin your code to colorize the node according to your needs. If you use such commands any colorization done by Inkscape will be lost after re-compilation. This method is the recommended one if you would like a character wise colorization of your output.
Preview button
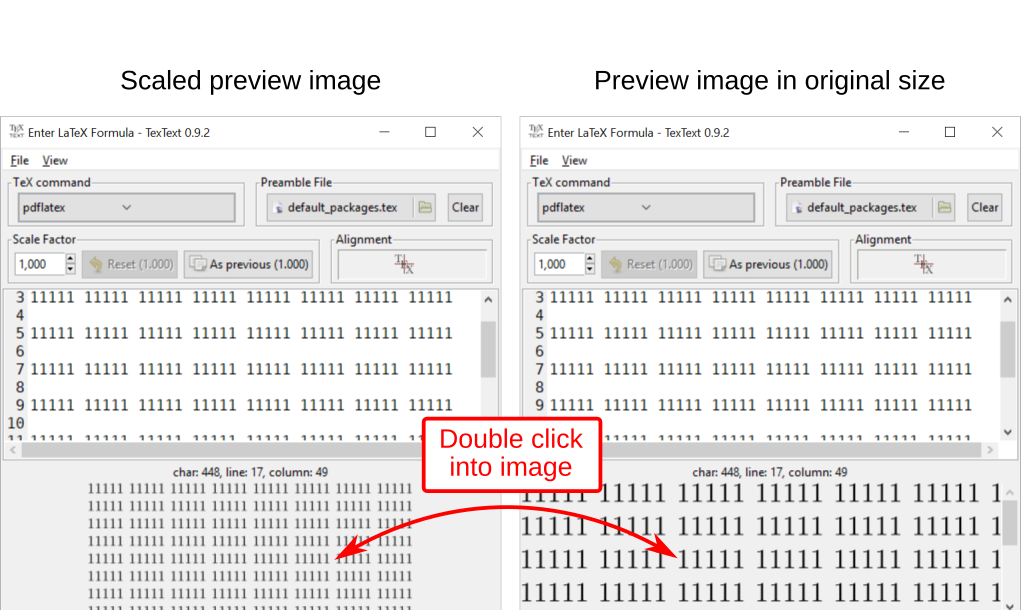
When pressing the Preview button your code will be compiled and the result
is displayed as an image in the area below the LaTeX code input field. If the
output extends a certain size it is displayed scaled so it fits into the available
area. You can double click into the preview image to obtain the result in original
size. Then, you can use the horizontal and vertical scroll bars to navigate along
your result. Double clicking again will bring you back to the scaled version of the
output.
Finally, click the Save button to insert the compiled code into your document.
Note
This feature is not available in the Tkinter GUI!
Configuration of the default TeX math-environment
New in version 0.10.0.
You can open the Settings menu and then New Node Content
to define which environment should be selected by default when creating new nodes.
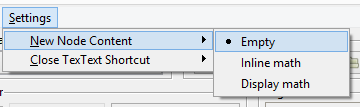
You have the following options:
Empty: The code editor is empty.Inline math: The code editor is filled with$$for typesetting an inline math expression.Display math: The code editor is filled with$$$$for typesetting a display math expression.
(Reminder on the difference between inline and display math)
Note
Currently, this feature is not available in the Tkinter GUI!
Selecting the shortcut for closing the TexText 0.11 window
New in version 0.11.0.
In the Settings menu you can configure by Confirm Closing Window if TexText 0.11 should ask for
confirmation to close the window in case you made changes to your text. Furthermore, under Close TexText Shortcut
you can select a shortcut for closing the TexText 0.11 window.
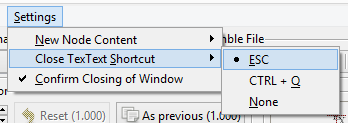
You have the following options:
Escape(default)CTRL + QNone: No shortcut active. Depending on your operating system a standard shortcut maybe available (e.g.ALT+F4on Windows).
Note
Currently, this feature is not available in the Tkinter GUI!
Configuration of the code editor
You can open the View menu which offers some possibilities
to configure the code editor:
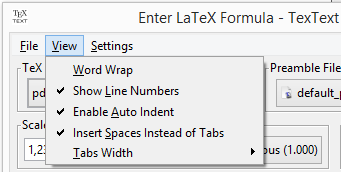
Word Wrap: If this option is checked long lines are wrapped automatically to window width.Show line numbers: If this option is checked line numbers are printed on the left hand side of the editor.Enabled auto indent: If this option is checked current indentation is preserved when breaking a new line (this is not an intelligent code dependent indentation feature).Insert spaces instead of TabsIf this option is checked each time you press theTabkey a number of spaces as defined inTabs Widthis inserted instead of a tabulator character.
Note
The last three options are only available if you have GTKSourceView installed
together with PyGTK (see installation instructions TexText 0.11 for Inkscape 0.92 on Linux,
TexText 0.11 for Inkscape 0.92 on Windows, TexText 0.11 for Inkscape 0.92 on MacOS)
Further reading
See Frequently Asked Questions (FAQ, TexText 0.11) and Troubleshooting (TexText 0.11)