Troubleshooting
Installation problems
The setup script offers several command line options which may help to fix the most common problems during the installation process. For this purpose open a Terminal or Windows Command Prompt and enter one of the commands listed below:
Inkscape is not found by the installation script -> specify the path to the executable:
Linux/ MacOS
python setup.py --inkscape-executable '/path/to/my Inkscape/inkscape'
Windows (note the double quotes!)
setup_win.bat --inkscape-executable "C:\My\Installation Location\bin\inkscape.exe"
Inkscape does not find TexText although it has been installed -> notify the setup script about a user-defined (non-standard) installation location for the Inkscape extensions
Linux/ MacOS
python setup.py --inkscape-extensions-path '/path/to/user defined/location'
Windows (note the double quotes!)
setup_win.bat --inkscape-extensions-path "C:\Users\My extension location"
The LaTeX engines are not found in the system path by the setup script -> specify the path to the executables:
Linux/ MacOS
python setup.py --pdflatex-executable '/path/to/my latex/pdflatex'
also available:
--lualatex-executableand--xelatex-executablefor the LuaLaTex and XeLaTeX executables, respectively.Windows (note the double quotes!)
setup_win.bat --pdflatex-executable "C:\Program Files\My Latex\pdflatex.exe"
also available:
--lualatex-executableand--xelatex-executablefor the LuaLaTex and XeLaTeX executables, respectively.The typst engine ist not found in the system path by the setup script -> specify the path to the executables:
Linux/ MacOS
python setup.py --typst-executable '/path/to/my typst/typst'
Windows (note the double quotes!)
setup_win.bat --typst-executable "C:\Program Files\My Typst\typst.exe"
Completely skip all requirement checks during installation and just copy the TexText files into the extension directory:
Linux/ MacOS
python setup.py --skip-requirements-check
Windows
setup_win.bat --skip-requirements-checkGeneral help:
Linux/ MacOS
python setup.py --help
Windows
setup_win.bat --help
Important
Do not hesitate to file a report if you cannot solve your installation problems: github
Problems running TexText
There are three main reasons why something may went wrong:
Your LaTeX code contains invalid commands or syntax errors.
The installed toolchain for the conversion of your code to a valid SVG element is for some reason broken.
TexText contains a bug and you are the person who discovered it!
TexText helps you to resolve such issues by offering detailed error and logging information.
This section is structured as follows:
TexText does not show up at all
If the TexText dialog does not open after having clicked on the TexText entry in the extension menu try the following:
If you are using TexLive and you updated TexLive recently the path to the TexLive executables may have changed. You can address this by thw following two methods:
Delete the file (if it exists)
~/.config/textext/.cache.json(Linux) orC:\Users\[Your UserName]\AppData\Roaming\textext\.cache.json(Windows) or~/Library/Preferences/textext/.cache.jsonand try to open TexText againDetermine the path of your pdflatex executable and install TexText again using the
--pdflatex-executablecommand line option:Linux, Mac:
python3 setup.py --pdflatex-executable /path/to/your/pdflatex-executableWindows:
setup_win.bat --pdflatex-executable /path/to/your/pdflatex-executable
Have a look for the file
textext.login the directory~/.cache/textext(Linux),C:\Users\[Your UserName]\AppData\Roaming\textext(Windows) or~/Library/Preferences/textext(Mac) and see if any useful error messages are logged into that file. You can use this information to further analyze the problem or to open an issue on GitHub asking for help: https://github.com/textext/textext/issues/new
LaTeX and toolchain errors
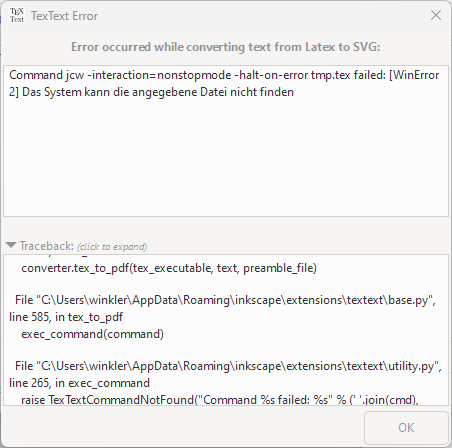
If compilation of your LaTeX code fails TexText opens a dialog displaying the cause of the failure. In most cases a syntax error in your code will be the reason. TexText filters the relevant information from the compiler output and displays it:
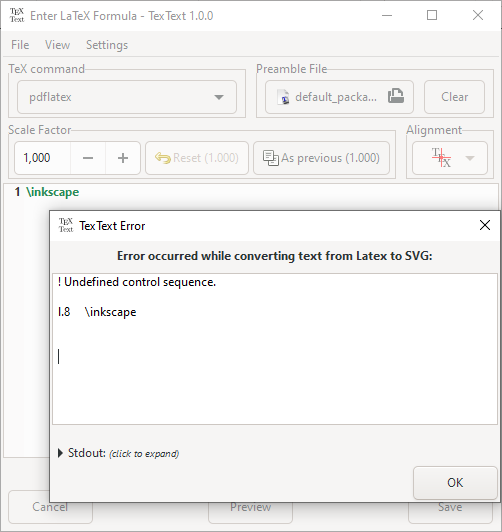
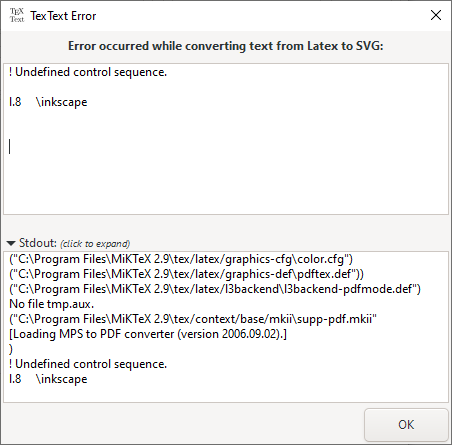
If you would like to see the full output of the LaTeX processor, click on the +
left to the stdout label:
Sometimes nothing meaningful can be stripped from the LaTeX processor output, or nothing has been produced by LaTeX which can be parsed by TexText:
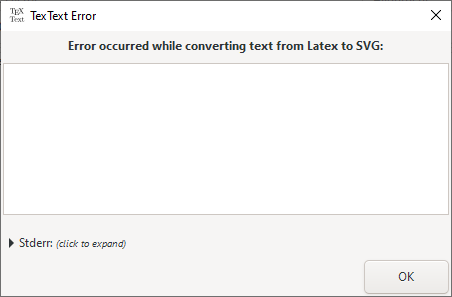
Most likely something serious failed during compilation and you may find additional
information under stderr , click on the + left to this label:
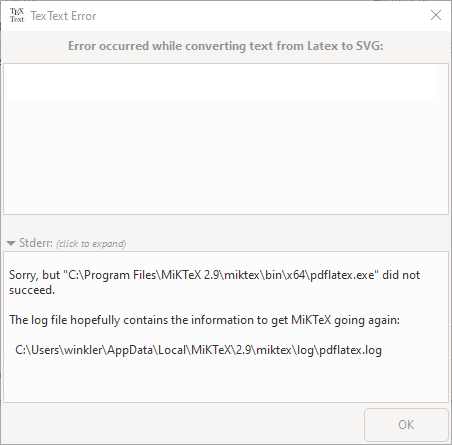
In that case follow the information given in the window (in the example given here: open the pdflatex.log in the AppData path).
Additionally, you have the possibility to display the full Python code traceback. This may help to locate more tricky errors in the Python code of the extension.
Note
The stderr option is only available when errors have been piped by the
failed command.
Bugs in TexText
Of course, TexText may contain bugs which may crash the plugin. If this happens information about the error can be either found in the TexText error dialog
or (hopefully) in an Inkscape error dialog that will show something like this:
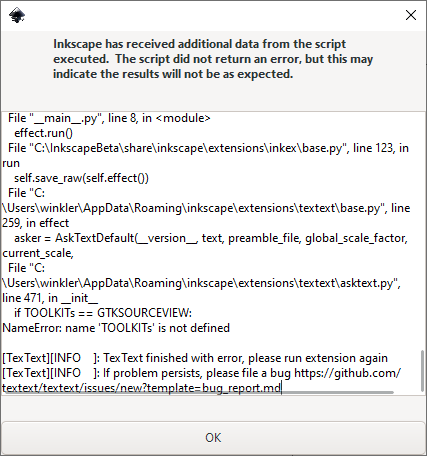
Note the advice at the end of the text view: You should run the extension again. Then, a logging mechanism is started which writes its result into the Inkscape error dialog:
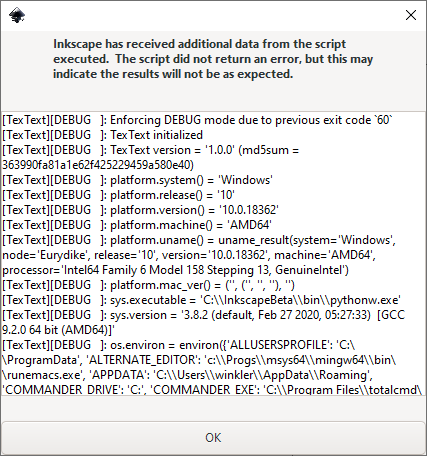
You can use this information to further analyze the problem or to open an issue on GitHub asking for help: https://github.com/textext/textext/issues/new
Important
Please carefully read the instructions in the issue template on GitHub so you pass all the required information to the developer team.
Manual use of the toolchain
For debugging purposes it may be required to manually process the steps usually done automatically by TexText. This procedure is also helpful if the result generated by TexText does not match your expectations at all and you are unsure if this is an error of TexText itself or of the programs used in the toolchain. Here is what you have to do in such cases:
Create a LaTeX document
test.texwith the following content:\documentclass{article} \usepackage{amsmath,amsthm,amssymb,amsfonts} \usepackage{color} \pagestyle{empty} \begin{document} % ***Your code*** \end{document}
Replace
% ***Your code***by the LaTeX code you want to compile and save the file to disk.Open a Terminal (Linux, MacOS) or Command Window (Windows)
On Linux: Open a file manager (e.g. Nautilus, Dolphin), navigate to directory of
test.tex. Right click and selectOpen in Terminal(Nautilus) or simply pressF4(Dolphin).On Windows: Open the explorer, navigate to the directory of
test.texand pressSHIFT + F10, then selectOpen Command Window Herefrom the context menu.
Compile this file using the command
pdflatex test.tex -interaction=nonstopmode -halt-on-error
Note
On Windows it may be required to put the name of the directory in which
pdflatex.exeresides in front ofpdflatex, e.g.c:\Program Files\MiKTeX 2.9\miktex\bin\x64\.If compilation succeeds open the generated file
test.pdfwith a pdf viewer and check its content. If it is as expected proceed with the next step.Check if the conversion from
pdftosvgsucceeds:inkscape --pdf-poppler --pages=1 --export-type=svg --export-text-to-path --export-area-drawing --export-filename test.svg test.pdf
Note
On Windows it may be required to put the name of the directory in which
inkscape.exeresides in front ofinkscape, e.g.c:\Program Files\Inkscape\bin\.Open the generated file
test.svgwith Inkscape and check the result.Check if the conversion of the strokes to paths in the
svgsucceeds:inkscape -g --batch-process --actions="EditSelectAll;StrokeToPath;export-filename:test.svg;export-do;EditUndo;FileClose" test.svg
Note
On Windows it may be required to put the name of the directory in which
inkscape.exeresides in front ofinkscape, e.g.c:\Program Files\Inkscape\bin\.Open the generated file
test.svgwith Inkscape and check the result (Visually there will be no difference between the svg generated in this step and that from step 5).Check if the conversion from
svgtopngfor the preview image succeedsinkscape --pdf-poppler --pdf-page=1 --export-type=png --export-area-drawing --export-dpi=300 --export-filename test.png test.pdf
Note
On Windows it may be required to put the name of the directory in which
inkscape.exeresides in front ofinkscape, e.g.c:\Program Files\Inkscape\bin\.Open the generated file
test.pngwith an image viewer and check the result.